

377Uploads
156k+Views
10k+Downloads
Art and design
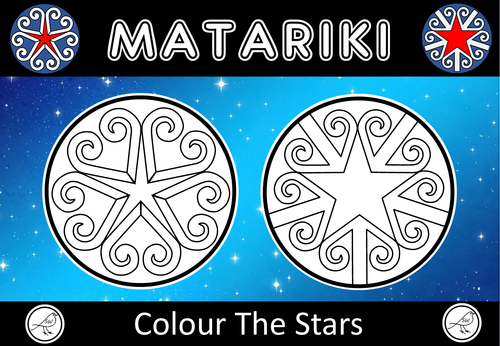
Matariki – Colour the Stars
Celebrate the Maori New Year with this art activity – colour the koru stars.
Two different templates.
A fun colouring activity for New Zealand students during Matariki.
Designed on A4 size paper.
© Suzanne Welch Teaching Resources
Colour Identification - 4 in a row gameboard
Practise your colour identification with these 3 gameboards.
UK and USA spelling included (colour/color grey/gray)
The Game: 4-in-a-row:
♦ Instructions and gameboards included.
♦ All you need is a dice and some counters.
♦ Suitable for 2 players.
How to play:
1. Player A rolls the dice.
2. Player A reads the colour word that is located under the picture of the dice on the left side of the board.
3. Player A finds that colour on the gameboard and covers one of those squares with one of their counters.
4. Player B has their turn.
5. Players continue to take turns. The winner is the first player to get 4 of their counters in a row.
Gameboard 1:
red, yellow, blue, green, black, orange
Gameboard 2:
white, pink, brown, purple, grey, cream
Gameboard 3:
light blue, dark blue, light green, dark green, light brown, dark brown

Colour Mixing
Colour Mixing – flashcards, activity sheets, game and reference chart
UK and USA spelling included (colour/color grey/gray)
Flash Cards - 3 different types:
♦ colour splodges and word equations
♦ colour splodge equations – work out the final colour
♦ colour splodge equations – work out the missing colour
Activity Sheets - 3 different types:
♦ colour the last splodge of the equation (print in colour)
♦ colour the splodges and work out the last splodge of the equation
♦ colour the splodges and work out the missing splodge
Game:
‘Four-in-a-row’ game - instructions and gameboard.
All you need is a dice and some counters.
1. Player A rolls the dice.
2. Player A reads the colour mixing equation that is located under the picture of the dice on the left side of the board.
3. Player A finds the answer to the colour mixing equation on the gameboard and covers one of those squares with one of their counters.
4. Player B has their turn.
5. Players continue to take turns. The winner is the first player to get 4 of their counters in a row.
The 6 colour mixing equations:
red + white = pink
blue + yellow = green
red + blue = purple
white + black = grey
green + red = brown
yellow + red = orange
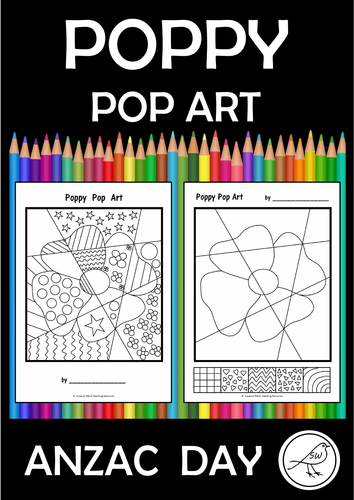
Anzac Day – Poppy Pop Art
A fun, effective art activity for your students when celebrating Anzac Day.
Draw some patterns on the poppy / background and colour it in.
4 different templates are included:
♦ TEMPLATE 1 and 2 – the patterns are given in the boxes at the base of the sheet. Students transfer these patterns to the poppy and the background and then colour everything in.
♦ TEMPLATE 3 – this is a blank template. Your students decide on their own 5 patterns and draw them in the boxes at the bottom of the sheet.
♦ TEMPLATE 4 – the patterns are already given on the poppy and the background. This is just a colouring activity.
**********************************************************************
© Suzanne Welch Teaching Resources

Valentine's Day - Secret Code Wheels - BUNDLE
This is a bundle of secret code wheels that are for Valentine’s Day.
There are 6 different types of code wheels:
* Alphabet and alphabet (ordered a-z)
* Alphabet and alphabet (jumbled)
* Alphabet and number (ordered 1-26)
* Alphabet and number (jumbled)
* Alphabet and symbol
* Blank - write the alphabet and create your own code
Each resource has 15 code wheel templates, each with Valentine’s Day pictures on the inner wheel.
5 of the resources contain a Valentine’s Day joke for your students to decipher with their wheel (the blank one doesn't contain the joke).
All of the resources contain a Valentine’s Day themed template for writing a secret code on (lined and unlined) as well as 2 card templates.
© Suzanne Welch Teaching Resources
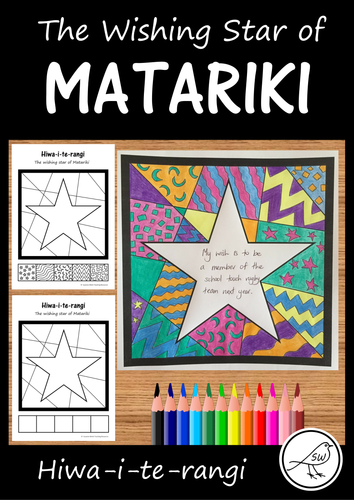
MATARIKI - Wishing Star
A creative classroom activity for celebrating Matariki (the Māori New Year).
Hiwa-i-te-rangi is one of the 9 stars in the Matariki star cluster. It is known as the ‘wishing star’. This star has a connection to our hopes, dreams and aspirations for the year ahead.
The Process:
1. Draw patterns in the spaces around the star shape (use a black ball-point pen).
2. Colour.
3. Write a wish in the star.
4. Cut out around the outside black frame.
5. Display on the wall (you may like to do this so it looks like a patchwork quilt).
Three different templates are provided for you to select from. Two templates have pre-drawn patterns in the boxes at the bottom, and one is blank so your students can design their own patterns.
Included:
♦ Instructions
♦ Information card about Hiwa-i-te-rangi
♦ Template A – with patterns
♦ Template B – with patterns
♦ Template C - blank (draw your own patterns)
Made on A4 size paper.
Finished size of artwork (after cutting it out) is approx 18cm x 18cm.
**********************************************************************
© Suzanne Welch Teaching Resources

Poppy Art – Remembrance Day, Memorial Day, Armistice Day, Anzac Day.
A ‘Fun with a Ruler’ art project for your students to complete leading up to Remembrance Day / Memorial Day / Armistice Day / Anzac Day.
This project involves your students ruling straight lines between 2 dots on a template, to create a poppy. Your students could write something in the petals before colouring (eg facts, opinons, a 4 line poem, etc). Display them together to make a 'poppy patchwork quilt'.
Included:
♦ Template – black dots
♦ Template – light grey dots
♦ Example – black/white
♦ Instructions
♦ Teacher notes
Level of Difficulty:
Your students need to be able to use a ruler to draw straight lines between 2 points (the curves are made with straight lines … it’s like magic!). The design looks more complicated than it actually is. Concentration is required, but the actual process is not difficult. A pattern is repeated 8 times.
Instructions:
Simple, clear, easy-to-follow instructions are provided. One instruction per page (image and a sentence). Display the instructions via a data projector if you have access to one. Otherwise print and enlarge them and/or demonstrate on an enlarged template.
Equipment:
You need a ruler and a pen (black works best). Something to colour with (eg coloured pencils, watercolours, felt tip markers, chalk pastels, dye, etc)
Size:
The artwork measures approximately 17cm x 17cm. Designed on A4 size paper.
Keywords: string art, parabolic curves, math, geometry, patterns, war, symbolism, veteran,
© Suzanne Welch Teaching Resources